
Now, we’ll focus on helping you move through the exercises to determine which ones can relieve pain and restore your back to health.
Designed for movement, your body needs to stay active for good health. When you are sedentary for prolonged periods, your muscles weaken, connective tissue stiffens, and joint lubrication is reduced. On the contrary, movement heals you and sustains you. Your physiology rewards your activity by releasing hormones that make you feel good and reduce stress.
The most common causes of back problems include poor posture and breathing mechanics, hip strain, physical trauma, age-related degeneration, a sedentary lifestyle, excess weight or pregnancy, and stress. Since most of these are related to muscle problems, the use of corrective exercises to mobilize and strengthen the muscles that support and move the spine is key to reducing and preventing back pain.
listening to your body
The mind-body connection is the bridge that helps you develop an attuned sense of your physical state, allowing you to respond to your body’s messages.
With back pain, misunderstanding or ignoring pain messages can cause injury, while overreacting can lead to unnecessary tests, medications, and procedures that could delay recovery. By tapping into your mind-body connection, you can better differentiate between warning sensations warning you to avoid particular movements and less severe ones stemming from muscle tension and joint stiffness. The latter is the kind of pain we want to go through to achieve relief.
Mindfulness meditation and breathing techniques can help strengthen your mind-body connection as you do the exercises below.
Practicing corrective exercises.
Here are three categories of exercises to treat lower back pain with examples for you to try.
When doing any exercise, stop immediately if your pain increases or you feel “wrong.” Remember to pay attention to any sensations you experience.
I have designed these exercises to address the most common causes of back pain, but since not all back pain responds to the same remedy, not all exercises work for everyone. Talk to your doctor to understand the source of your pain and get approval before beginning any exercise program.
Although many of these exercises can work for low back pain with sciatic nerve symptoms, Part III of our series will focus on sciatica and offer additional methods for managing its nerve-related presentations.
1. Breathing and posture exercises
Practicing proper diaphragmatic breathing is the foundation of all of the back pain prevention and treatment programs I use in professional sports. Because your primary respiratory muscle, the diaphragm, is also a core and postural muscle that attaches to your lumbar spine and rib cage, by establishing proper breathing biomechanics, you can realign your spine, pelvis, and rib cage while strengthen your base. Deep breathing also decreases your body’s physiological response to stress and facilitates recovery.
breathing bridge
Start on your back with your knees bent and feet on the floor, hip-width apart.
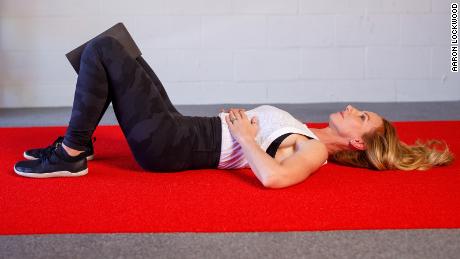
Hold a foam yoga block or rolled towel between your knees to prevent them from spreading.
Place your hands on your lower ribs to guide and monitor your movement in and out with each breath.
Exhale fully, drawing your lower ribs toward each other, feeling your core light up and your rib cage move down. At the end of that exhale, without inhaling, tuck your tailbone in to flatten your lower back and lift your hips 3 to 4 inches off the floor.

Maintaining the bridge pose, take five long, deep breaths, concentrating on the correct movement of the ribs, particularly on the exhalations.
Hold this position using the strength of your core and glutes to keep your lower back from arching.
Avoid upward movement of the rib cage as you breathe; You should feel no stress or tension in your jaw, neck, or shoulders.
If you experience warning pain when lifting your hips into the bridge, keep your hips and back on the ground as you practice your breaths.
Practice two sets for a total of 10 breaths.
2. Hip and pelvic mobility exercises
The lumbar vertebrae of the lower back are not designed to twist; they are meant to be stable. The hips are designed with ball joints to allow rotation in all directions.
Unfortunately, if your hips are tight or your pelvis doesn’t move freely, it puts pressure on your lower back. It’s important to avoid that pressure by creating a healthy balance between hip and pelvic mobility and lumbar stability.
3. Exercises for mid-back rotation
Your thoracic spine in the middle of your back is designed to rotate, and when it doesn’t rotate well, it makes your lower back compensate. Mid-back rotation exercises are good for taking pressure off your lower back and creating healthy spinal motion.
This bent-knee double twist uses your breath and corresponding rib movement to support healthy rotation from your mid-back while keeping your lower back stable. When attempting any type of mid-back twist exercise, keep these instructions in mind.
Double twist with bent knee
Lie on your right side with your knees bent at 90 degrees and in line with your hips.
Use a pad or pillow under your head to keep your neck neutral.
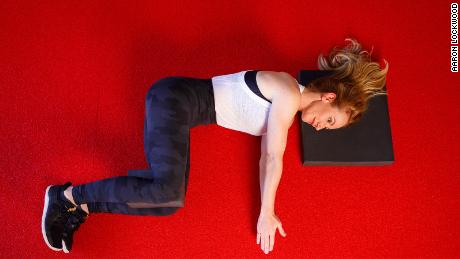
Place a yoga block or pillow between your knees.
Make sure to stack your shoulders, hips, and knees.
Extend both arms in front of you in line with your shoulders with your palms together and your hands flat on the floor.
Inhale as you open your left arm to the left while keeping your lower body in place to the right; knees and hips remain aligned and stacked. This is important to keep your lower back stable.
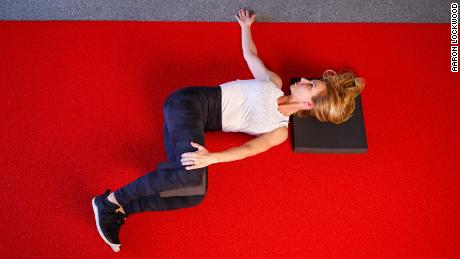
Rotate from the middle of your back, not from the lower back.
Place your right hand on the outside of your left leg to help hold it in place.
Exhale and focus on bringing your lower ribs inward on the right side of your ribcage to help rotate your ribcage and thoracic spine further into the twist.
Take four more breaths, hold the position, and continue to focus on the movement of the ribs as you exhale to guide the rotation. Then release back to the beginning.

Repeat from the left side.
After trying exercises that fit into these three categories, decide what works for you and do it daily for at least two weeks.
If sciatica is an aspect of your low back pain, look to the next article in this series for techniques to relieve your nerve pain. Once you start to see an improvement in your back health, check out the fourth installment in the series to create a proactive maintenance plan to prevent pain.
.